SpringSecurity 使用 RSA 非对称加密
转载自 SpringBoot整合Spring Security【超详细教程】
代码地址:https://github.com/lrhh123/SpringSecurityDemo/tree/main/SpringSecurityDemo
这篇笔记除了将 RSA 部分,也算再回顾一次 SpringSecurity 的使用
注意:源码依赖中 joda-time 没有指定版本,导致打包后一直显示缺少依赖... 所以要加上依赖
<dependency>
    <groupId>joda-time</groupId>
    <artifactId>joda-time</artifactId>
    <version>2.10.10</version>
</dependency>
为什么要使用 RSA?
先来回顾一下平时使用 JWT 认证是怎么样的
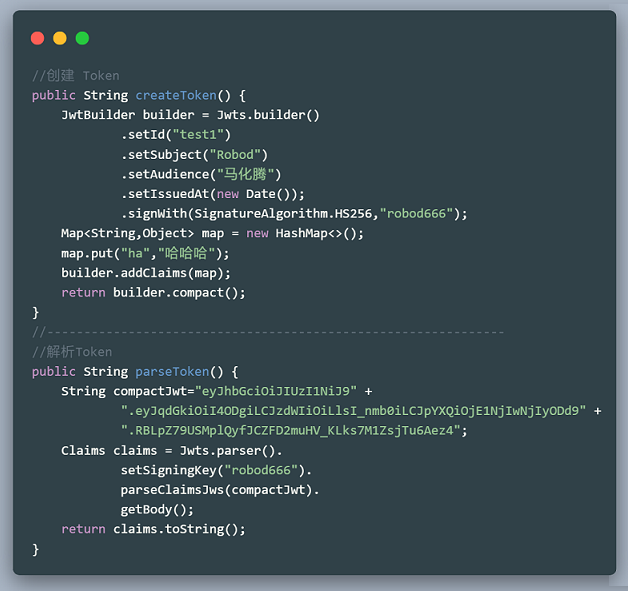
从上面的例子中可以看出,JWT在加密解密的时候都用到了同一个密钥 robod666,这将会带来一个弊端,如果被黑客知道了密钥的内容,那么他就可以去伪造 Token 了。所以为了安全,我们可以使用非对称加密算法 RSA。
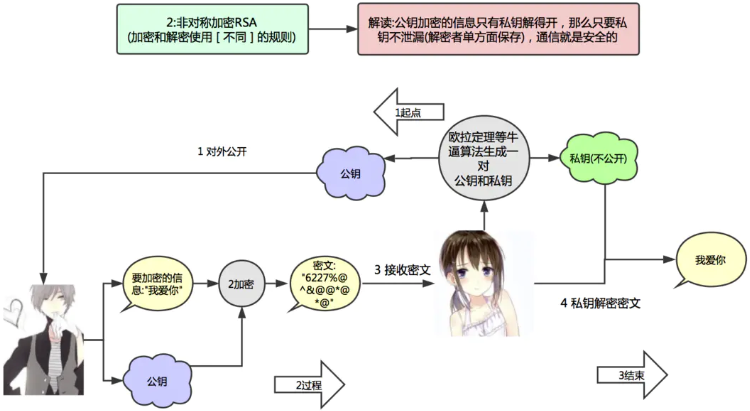
RSA 的基本原理有两点:
- 私钥加密,持有私钥或公钥才可以解密
- 公钥加密,持有私钥才可解密
不够,这里的 RSA 是反过来用,即 “数字签名技术”
创建公钥和私钥
这里调用下面提供的 RsaUtils 工具类生成密钥
创建一个测试类用来生成密钥
class RsaUtilsTest {
    private final String privateFilePath = "C:/Users/alsritter/Desktop/temp/spring-security-rsa/authentication_server/src/main/resources/rsa/id_key_rsa";
    private final String publicFilePath = "C:/Users/alsritter/Desktop/temp/spring-security-rsa/authentication_server/src/main/resources/rsa/id_key_rsa.pub";

    @Test
    public void generateKey() throws Exception {
        RsaUtils.generateKey(publicFilePath,privateFilePath,"123456",2048);
    }

    @Test
    public void getPublicKey() throws Exception {
        System.out.println(RsaUtils.getPublicKey(publicFilePath));
    }

    @Test
    public void getPrivateKey() throws Exception {
        System.out.println(RsaUtils.getPrivateKey(privateFilePath));
    }

}
创建数据库
为了不影响阅读,SQL 数据 放在 GitHub 的 gist 里面

一共三张表,分别是用户表,角色表,用户-角色表。用户是登录用的,密码其实就是加密过的字符串,内容是 123;角色是做权限控制时用的。
rsa:
  key:
    pubKeyPath: "C:/Users/alsritter/Desktop/temp/spring-security-rsa/authentication_server/src/main/resources/rsa/id_key_rsa.pub"
    priKeyPath: "C:/Users/alsritter/Desktop/temp/spring-security-rsa/authentication_server/src/main/resources/rsa/id_key_rsa"

server:
  port: 9001

spring:
  datasource:
    driver-class-name: com.mysql.cj.jdbc.Driver
    url: jdbc:mysql:///studyrsa?useUnicode=true&characterEncoding=UTF-8&serverTimezone=UTC
    username: root
    password: root

mybatis:
  type-aliases-package: 'com.alsritter.authenticationserver.entity'
  configuration:
    map-underscore-to-camel-case: true

logging:
  level:
    com: debug
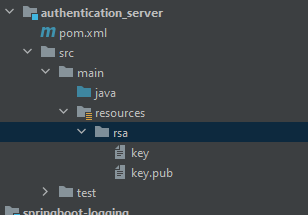
创建认证服务
然后在父工程里面创建一个 Module 作为认证服务,名叫 authentication_server。添加必要的依赖。
把这个 rsa 拖进去,方便读取
项目的配置文件内容截取了核心的部分贴在下面:
…………
# 配置了公钥和私钥的位置
rsa:
  key:
    pubKeyPath: "C:/Users/alsritter/Desktop/temp/spring-security-rsa/authentication_server/src/main/resources/rsa/id_key_rsa.pub"
    priKeyPath: "C:/Users/alsritter/Desktop/temp/spring-security-rsa/authentication_server/src/main/resources/rsa/id_key_rsa"
这里的公私钥的标签是自定义的,并不是 Spring 提供的标签,后面我们会在 RSA 的配置类中去加载这一部分内容。
为了方便起见,我们还可以准备几个 工具类
- JsonUtils:提供了 JSON 相关的一些操作;
- JwtUtils:生成 Token 以及校验 Token 相关方法;
- RsaUtils:生成公钥私钥文件,以及从文件中读取公钥私钥。
我们可以将载荷单独封装成一个对象:
@Data
public class Payload<T> {
    private String id;
    private T userInfo;
    private Date expiration;
}
现在再去写一个测试类,调用 RsaUtils 中的相应方法去生成公钥和私钥。
编写 RSA 的配置类 ⭐
那公钥私钥生成好了在使用的时候是怎么获取的呢?为了解决这个问题,我们需要创建一个 RSA 的配置类
首先需要添加配置
<dependency>
    <groupId>org.springframework.boot</groupId>
    <artifactId>spring-boot-configuration-processor</artifactId>
    <optional>true</optional>
</dependency>
编写指定的配置项
@Data
@ConfigurationProperties("rsa.key")     //指定配置文件的key
public class RsaKeyProperties {

    private String pubKeyPath;

    private String priKeyPath;

    private PublicKey publicKey;
    private PrivateKey privateKey;

    @PostConstruct
    public void createKey() throws Exception {
        this.publicKey = RsaUtils.getPublicKey(pubKeyPath);
        this.privateKey = RsaUtils.getPrivateKey(priKeyPath);
    }
}
首先我们使用了 @ConfigurationProperties 注解去指定公钥私钥路径的 key,然后在构造方法中就可以去获取到公钥私钥的内容了。这样在需要公钥私钥的时候就可以直接调用这个类了。
但是不放入 Spring 容器中怎么调用这个类,所以在启动类中添加一个注解:
@SpringBootApplication
@EnableConfigurationProperties(RsaKeyProperties.class)  //将配置类放入 Spring 容器中
public class AuthenticationApplication {
    public static void main(String[] args) {
        SpringApplication.run(AuthenticationApplication.class, args);
    }
}
这表示把 RSA 的配置类放入 Spring 容器中。
用户登录
这里完整的代码,看项目对应的文件 https://github.com/lrhh123/SpringSecurityDemo/tree/main/SpringSecurityDemo
登录流程回顾一下:请求首先会进入 UsernamePasswordAuthenticationFilter 并且设置权限为 null 和是否授权为 false,然后进入 ProviderManager 查找支持 UsernamepasswordAuthenticationToken 的 provider 并且调用 provider.authenticate(authentication); 再然后就是 UserDetailsService 接口的实现类(也就是自己真正具体的业务了),这时候都检查过了后,就会回调 UsernamePasswordAuthenticationFilter 并且设置权限(具体业务所查出的权限)和设置授权为 true(因为这时候确实所有关卡都检查过了)。
在上面这段话中,提到了一个 UsernamePasswordAuthenticationFilter,我们一开始进入的就是这个过滤器的 attemptAuthentication() 方法,但是这个方法是从 form 表单中获取用户名密码,和我们的需求不符,所以我们需要重写这个方法。然后经过一系列的周转,进入到了 UserDetailsService.loadUserByUsername() 方法中,所以我们为了实现自己的业务逻辑,需要去实现这个方法。
这个方法返回的是一个 UserDetails 接口对象,如果想返回自定义的对象,可以去实现这个接口。最终用户验证成功之后,调用的是 UsernamePasswordAuthenticationFilter 的父类 AbstractAuthenticationProcessingFilter.successfulAuthentication() 方法,我们也需要去重写这个方法去实现我们自己的需求。
实现 UserDetails 接口
SysUser 类去实现 UserDetails 接口,然后添加了几个自定义的字段
@Data
public class SysUser implements UserDetails {

    private Integer id;
    private String username;
    private String password;
    private Integer status;
    private List<SysRole> roles = new ArrayList<>();
    …………
}
定义了一个接口 UserService 去继承 UserDetailsService,然后用 UserServiceImpl 实现了 UserService,就相当于UserServiceImpl 实现了 UserDetailsService,这样我们就可以去实现 loadUserByUsername() 方法
内容很简单,就是用用户名去数据库中查出对应的 SysUser,然后具体的验证流程就可以交给其它的过滤器去实现了,我们就不用管了。
public interface UserService extends UserDetailsService {
}

//-----------------------------------------------------------

@Service("userService")
public class UserServiceImpl implements UserService {
    …………
    @Override
    public UserDetails loadUserByUsername(String username) throws UsernameNotFoundException {
        SysUser sysUser = userMapper.findByUsername(username);
        return sysUser;
    }
}
前面提到了需要去重写 attemptAuthentication()、successfulAuthentication() 方法,那就自定义一个过滤器去继承 UsernamePasswordAuthenticationFilter 然后重写这两个方法吧👇
public class JwtLoginFilter extends UsernamePasswordAuthenticationFilter {

    private AuthenticationManager authenticationManager;
    private RsaKeyProperties rsaKeyProperties;

    public JwtLoginFilter(AuthenticationManager authenticationManager, RsaKeyProperties rsaKeyProperties) {
        this.authenticationManager = authenticationManager;
        this.rsaKeyProperties = rsaKeyProperties;
    }

    //这个方法是用来去尝试验证用户的
    @Override
    public Authentication attemptAuthentication(HttpServletRequest request, HttpServletResponse response) throws AuthenticationException {
        try {
            SysUser user = JSONObject.parseObject(request.getInputStream(),SysUser.class);
            return authenticationManager.authenticate(
                    new UsernamePasswordAuthenticationToken(
                           user.getUsername(),
                           user.getPassword())
            );
        } catch (Exception e) {
            try {
                response.setContentType("application/json;charset=utf-8");
                response.setStatus(HttpServletResponse.SC_UNAUTHORIZED);
                PrintWriter out = response.getWriter();
                Map<String, Object> map = new HashMap<>();
                map.put("code", HttpServletResponse.SC_UNAUTHORIZED);
                map.put("message", "账号或密码错误!");
                out.write(new ObjectMapper().writeValueAsString(map));
                out.flush();
                out.close();
            } catch (Exception e1) {
                e1.printStackTrace();
            }
            throw new RuntimeException(e);
        }
    }

    //成功之后执行的方法
    @Override
    public void successfulAuthentication(HttpServletRequest request, HttpServletResponse response, FilterChain chain, Authentication authResult) throws IOException, ServletException {
        SysUser sysUser = new SysUser();
        sysUser.setUsername(authResult.getName());
        sysUser.setRoles((List<SysRole>) authResult.getAuthorities());
        // 私钥加密 token
        String token = JwtUtils.generateTokenExpireInMinutes(sysUser,rsaKeyProperties.getPrivateKey(),24*60);
        response.addHeader("Authorization", "Token " + token);  //将Token信息返回给用户
        try {
            //登录成功时,返回json格式进行提示
            response.setContentType("application/json;charset=utf-8");
            response.setStatus(HttpServletResponse.SC_OK);
            PrintWriter out = response.getWriter();
            Map<String, Object> map = new HashMap<String, Object>(4);
            map.put("code", HttpServletResponse.SC_OK);
            map.put("message", "登陆成功!");
            out.write(new ObjectMapper().writeValueAsString(map));
            out.flush();
            out.close();
        } catch (Exception e1) {
            e1.printStackTrace();
        }
    }
}
编写配置类
现在重点来了,Spring Security 怎么知道我们要去调用自己的 UserService 和自定义的过滤器呢?所以我们需要配置一下,这也是使用 Spring Security 的一个核心——>配置类👇
@Configuration
@EnableWebSecurity      //这个注解的意思是这个类是Spring Security的配置类
public class WebSecurityConfig extends WebSecurityConfigurerAdapter {

    private final UserService userService;

    private final RsaKeyProperties rsaKeyProperties;

    public WebSecurityConfig(UserService userService, RsaKeyProperties rsaKeyProperties) {
        this.userService = userService;
        this.rsaKeyProperties = rsaKeyProperties;
    }

    @Bean
    public BCryptPasswordEncoder passwordEncoder() {
        return new BCryptPasswordEncoder();
    }

    //认证用户的来源
    @Override
    protected void configure(AuthenticationManagerBuilder auth) throws Exception {
        auth.userDetailsService(userService).passwordEncoder(passwordEncoder());
    }

    //配置SpringSecurity相关信息
    @Override
    public void configure(HttpSecurity http) throws Exception {
        http.csrf().disable()  //关闭csrf
                .addFilter(new JwtLoginFilter(super.authenticationManager(),rsaKeyProperties))
                .sessionManagement().sessionCreationPolicy(SessionCreationPolicy.STATELESS);    //禁用session
    }

}
在配置类中,配置了认证用户的来源和添加了自定义的过滤器。这样就可以实现登录的功能了。
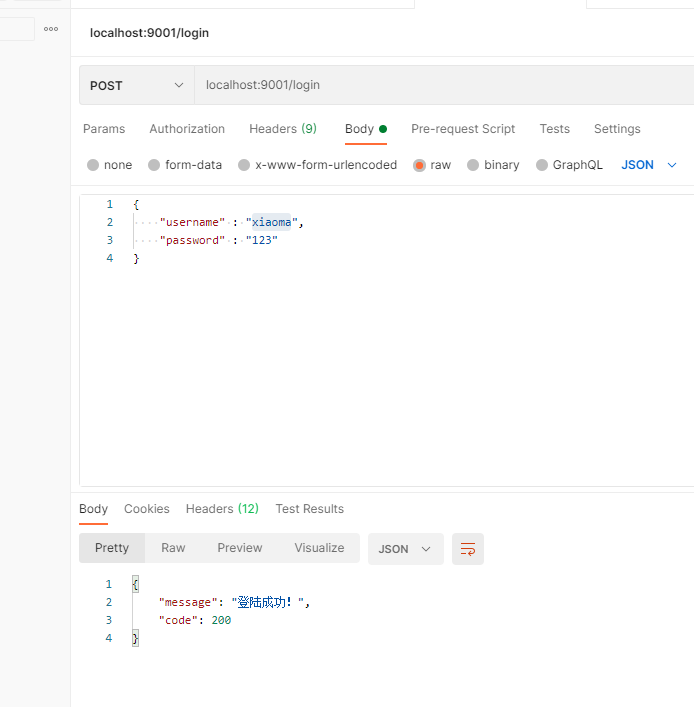
可以看到,现在已经成功登录了,但是这个 /login 是从哪儿来的呢,这个是 Spring Security 自己提供的,用户名的键必须是 username,密码的键必须是 password,提交方式必须是 POST。
总结一下,实现登录的功能需要做哪些操作:
- 认证用户实现 UserDetails 接口
- 用户来源的 Service 实现 UserDetailsService 接口,实现
loadUserByUsername()方法,从数据库中获取数据 - 实现自己的过滤器继承 UsernamePasswordAuthenticationFilter,重写
attemptAuthentication()和successfulAuthentication()方法实现自己的逻辑 - Spring Security 的配置类继承自 WebSecurityConfigurerAdapter,重写里面的两个
config()方法 - 如果使用 RSA 非对称加密,就准备好 RSA 的配置类,然后在启动类中加入注解将其加入 IOC 容器中
资源服务器权限校验
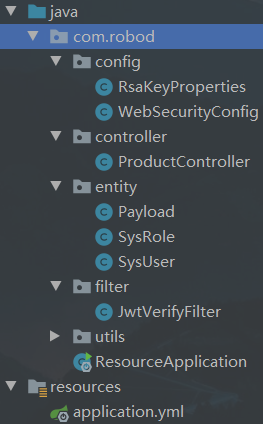
在这一小节,我们要实现去访问资源服务器中的资源,并进行鉴权的操作。在父工程 SpringSecurityDemo 中再创建一个模块 recourse_server。因为我们现在并不需要从数据库中获取用户信息。所以就不需要自己去定义 Service 和 Mapper 了。也不需要登录的过滤器了。
下面这张目录结构图是资源服务工程所需要的所有东西。
SysRole 上一节中用到了但是没有详细说明。这个类是用来封装角色信息的,做鉴权的时候用的,实现了 GrantedAuthority 接口:
@Data
public class SysRole implements GrantedAuthority {

    private Integer id;
    private String roleName;
    private String roleDesc;

    /**
     * 如果授予的权限可以当作一个String的话,就可以返回一个String
     * @return
     */
    @JsonIgnore
    @Override
    public String getAuthority() {
        return roleName;
    }

}
里面实现了 getAuthority 方法,直接返回 roleName 即可。roleName 是角色名。
取得 Token 中的信息
客户端将 Token 传到资源服务器中,服务器需要对 Token 进行校验并 取出其中的载荷信息。
所以我们可以自定义一个过滤器继承自 BasicAuthenticationFilter,然后重写 doFilterInternal() 方法,实现自己的逻辑。
public class JwtVerifyFilter extends BasicAuthenticationFilter {
    …………
    @Override
    protected void doFilterInternal(HttpServletRequest request, HttpServletResponse response, FilterChain chain)
            throws IOException, ServletException {
        String header = request.getHeader("Authorization");
        //没有登录
        if (header == null || !header.startsWith("Token ")) {
            chain.doFilter(request, response);
            response.setContentType("application/json;charset=utf-8");
            response.setStatus(HttpServletResponse.SC_FORBIDDEN);
            PrintWriter out = response.getWriter();
            Map<String, Object> map = new HashMap<String, Object>(4);
            map.put("code", HttpServletResponse.SC_FORBIDDEN);
            map.put("message", "请登录!");
            out.write(new ObjectMapper().writeValueAsString(map));
            out.flush();
            out.close();
            return;
        }

        //登录之后从token中获取用户信息(这里用公钥解密)
        String token = header.replace("Token ","");
        SysUser sysUser = JwtUtils.getInfoFromToken(token, rsaKeyProperties.getPublicKey(), SysUser.class).getUserInfo();
        if (sysUser != null) {
            Authentication authResult = new UsernamePasswordAuthenticationToken
                    (sysUser.getUsername(),null,sysUser.getAuthorities());
            SecurityContextHolder.getContext().setAuthentication(authResult);
            chain.doFilter(request, response);
        }
    }
}
在这段代码中,先是从请求头中获取 "Authorization" 的值,如果值未 null 或者不是以我们规定的 Token 开头就说明不是我们设置的 Token,就是没登录,提示用户登录。有 Token 的话就调用 JwtUtils.getInfoFromToken() 去验证并获取载荷的内容。验证通过的话就在 Authentication 的构造方法中把角色信息传进去,然后交给其它过滤器去执行即可。
私钥应该只保存在认证服务器中,所以资源服务器中只要存公钥就可以了。
rsa:
  key:
    pubKeyPath: "C:/Users/alsritter/Desktop/temp/spring-security-rsa/authentication_server/src/main/resources/rsa/id_key_rsa.pub"
编写 RSA 配置类
同理,写一个配置类(别忘了导入依赖)
<dependency>
    <groupId>org.springframework.boot</groupId>
    <artifactId>spring-boot-configuration-processor</artifactId>
    <optional>true</optional>
</dependency>
@Data
@ConfigurationProperties("rsa.key")     //指定配置文件的key
public class RsaKeyProperties {

    private String pubKeyPath;

    private PublicKey publicKey;

    @PostConstruct
    public void createKey() throws Exception {
        this.publicKey = RsaUtils.getPublicKey(pubKeyPath);
    }
}
配置 Spring Security
接下来就是 Spring Security 核心的配置文件了👇
@Configuration
@EnableWebSecurity
@EnableGlobalMethodSecurity(securedEnabled = true)  //开启权限控制的注解支持,securedEnabled表示SpringSecurity内部的权限控制注解开关
public class WebSecurityConfig extends WebSecurityConfigurerAdapter {
    …………
    //配置SpringSecurity相关信息
    @Override
    public void configure(HttpSecurity http) throws Exception {
        http.csrf().disable()  //关闭csrf
                .authorizeRequests()
                .antMatchers("/**").hasAnyRole("USER") //角色信息
                .anyRequest()   //其它资源
                .authenticated()    //表示其它资源认证通过后
                .and()
                .addFilter(new JwtVerifyFilter(super.authenticationManager(),rsaKeyProperties))
                .sessionManagement().sessionCreationPolicy(SessionCreationPolicy.STATELESS);    //禁用session
    }

}
这里面有个注解 @EnableGlobalMethodSecurity(securedEnabled = true),这个注解的意思是开启权限控制的注解支持。然后添加了自定义的 Token 解析过滤器。最后在需要进行权限控制的方法上添加注解即可
@RestController
@RequestMapping("/product")
public class ProductController {

    @Secured("ROLE_PRODUCT")
    @RequestMapping("/findAll")
    public String findAll() {
        return "产品列表查询成功";
    }

}
好了,这样 findAll 方法就需要有 "ROLE_PRODUCT" 权限才能访问。我们来测试一下:
首先还是在授权服务器中取得 Token
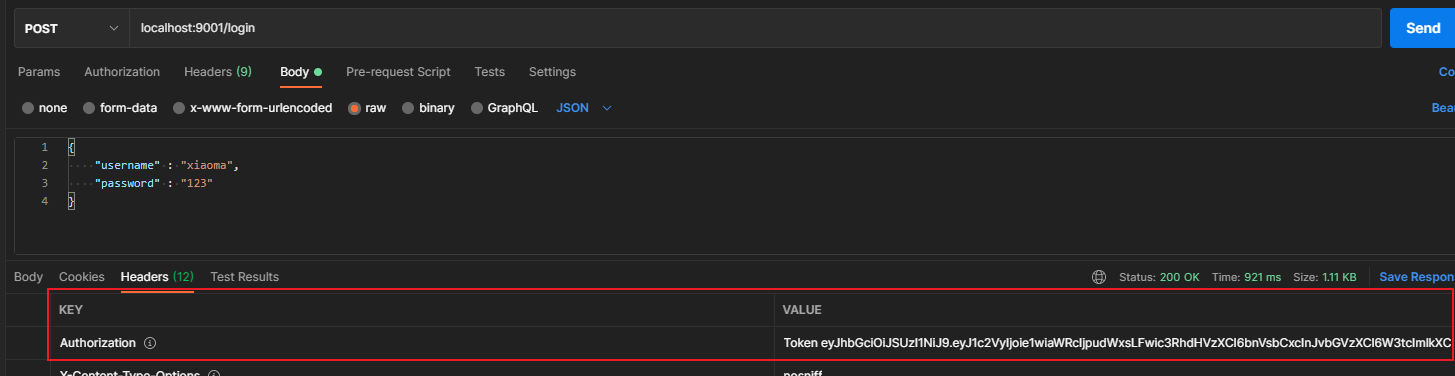
登录成功之后,响应头中有服务器返回的Token信息,把它复制下来,然后添加到我们请求的请求头中。
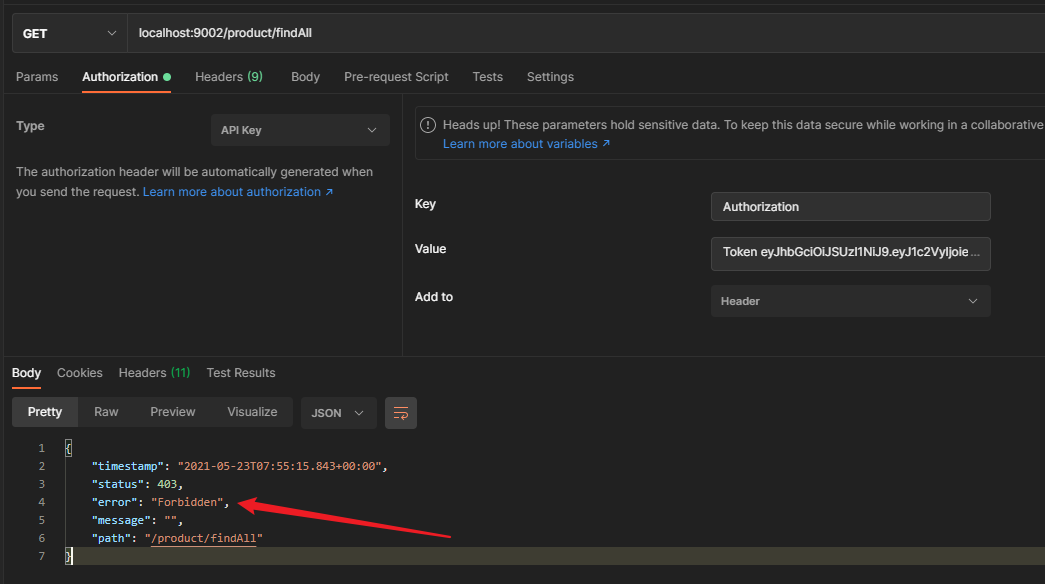
显示无权限,换个有权限的用户
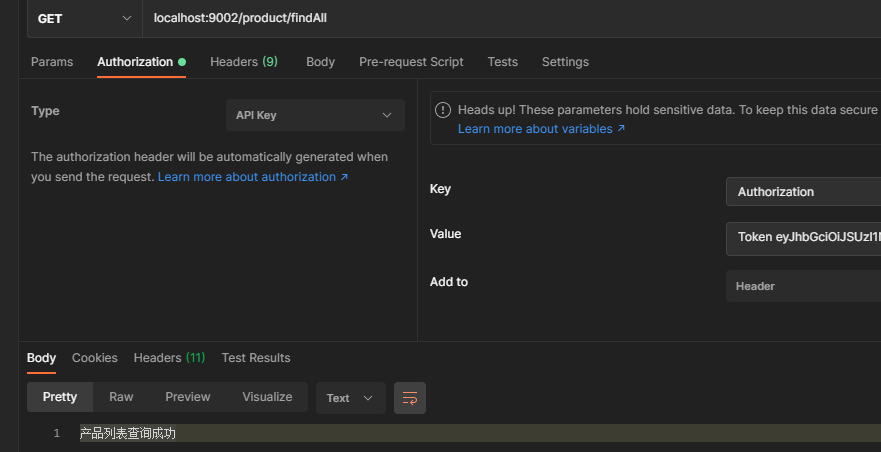
可以看到,现在已经成功访问到资源了。